
1. Confirm TV Channel Exclusions
Start by confirming the auto-enabled TV channel exclusions. This can be done by uploading or searching for a Scan File using the Scan Recon window. You can enable or disable channels as needed by clicking the channel number below the Plot or within the TV Scout window.
💡 Tip: Use the latest available data for your venue to achieve the best results. A Scan File captured with the equipment and antenna system that will be used will provide a clear picture of which TV channels are able to be operated in.
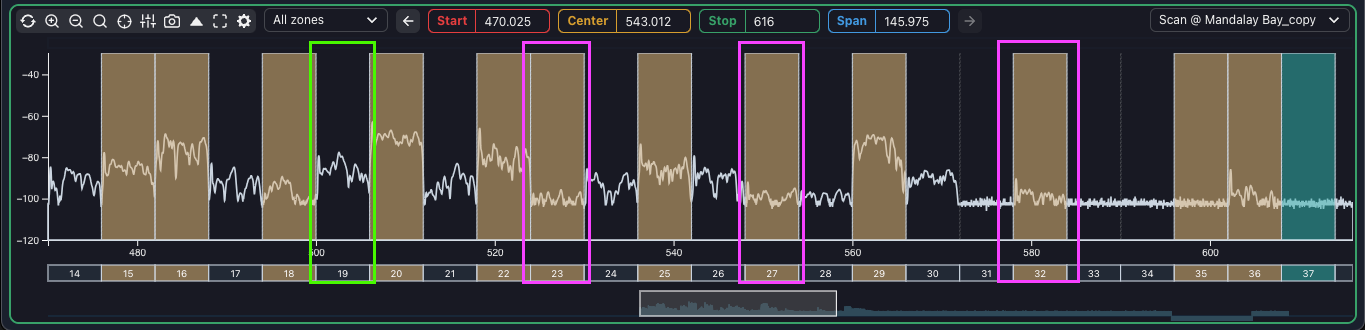
The brownish blocks are enabled TV channel exclusions, and no candidate frequencies will be calculated within these enabled blocks. Based on the example, it will most likely be safe to disable channels 23, 27 and 32 (highlighted in Pink), and channel 19 (highlighted in Green) should probably be enabled.
📢 Note: Always properly allocate the available spectrum BEFORE calculating any frequencies for the best results.
2. Prepare a Band Plan
The next step is to prepare a band plan. This is a plan of execution for the coordination and can be as simple or complex as needed, ranging from allocating bandwidth to specific devices or individual frequencies across the entire project to maintaining spectrum separation between different types of devices.
Generally, start calculating frequencies for the device that has the least available candidate frequencies as determined by the equipment profile’s tunability and any excluded bandwidth from enabled TV channel exclusions.
For example, a Shure PSM200 with only 8 available fixed frequencies should be calculated before a Shure ULX-D with a free tunable bandwidth.
3. Select the First Device
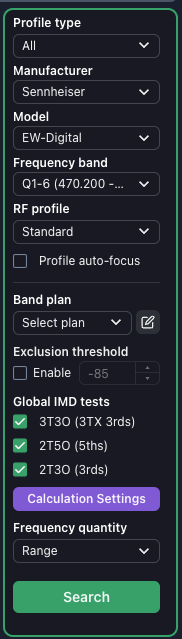
Select the first device according to your band plan within the Calculation Area. Select the Manufacturer, Model and Frequency band.
The RF profile selector allows changing the tolerances of the device to allow for wider or tighter spacing. In an environment with reasonable open spectrum, the Standard RF Profile variant is suitable.
The Global IMD controls are typically for more advanced users that need fine-grained control and should be used with caution.
The Frequency quantity selector enables you to search for a range of frequencies (as many frequencies as possible), a Single Frequency (to test whether a value is valid), a specific quantity of frequencies, or “Uncoordinated”.
📌 Note: Using the “Uncoordinated” selection allows a user to follow the same calculation pattern as Wireless Workbench by adding a quantity of devices, then calculating all at once with all equipment considered.
4. Select Candidate Frequencies
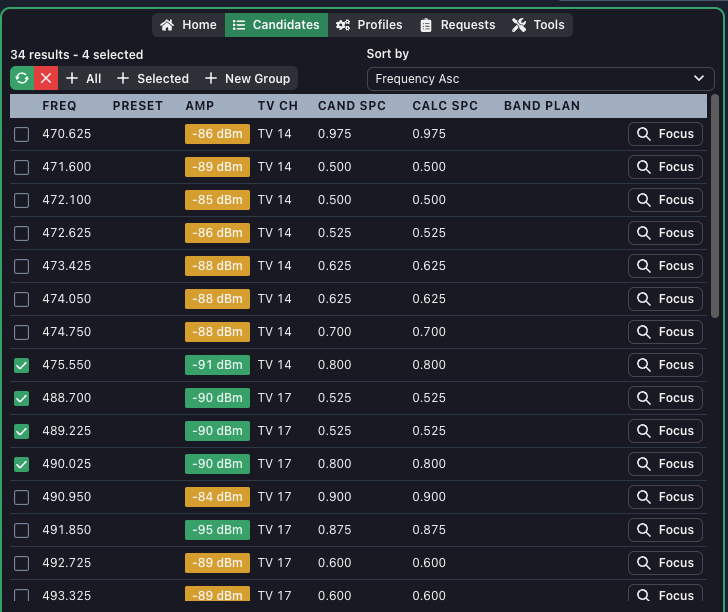
Select candidate frequencies from the Candidate list and add them to the selected Group. When a Scan File is selected in the Zone, candidate frequencies will display the approximate amplitude of the scan file at the candidate frequency.
5. Repeat the Process
Repeat this process with all the devices that will be used in the coordination.
6. Test and Confirm Frequencies
Once deployed, test and confirm that all frequencies are clean. Although Coord is very good at calculating clean and clear frequencies, the physical environment always can play a role.